| Gothic Steam Phantastic > Information > Gothic Terragen |
Gothic Terragen tutorial |
 |
| -*- Home -*- Daleth-*- I&I RPG -*- Information -*- Forum -*- Credits -*- Links -*- |
|
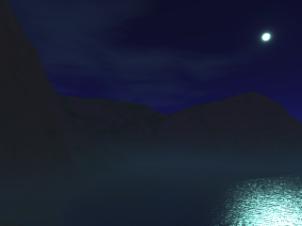
This tutorial is about making a spooky “gothic” landscape with the use of Terragen and some additional painting software. Terragen is a freeware landscape creating program for both PC and Macintosh. It’s rather easy to use and even the most non-artist can make beautifully rendered pictures with it. The software can be downloaded from Planetside. In order to use this tutorial, you need to have done some experiments with Terragen so you know where all the handles and buttons are and how you can create a landscape that suits your ideas. There are several Terragen tutorials for beginners on the Internet. Now how do you make a spooky landscape? It needs to be dark and preferably night, with mists swirling over a deserted lake. The sun has to go, we need a moon. Terragen as freeware does not provide any add ons like castles... so that is what we have to create ourselves. First step is to make a landscape. A random one will do. However, spooky landscapes usually come with edgy mountains. Preferably, you make a lake to let the sun/moon be reflected in. Chose an angle where you can see the sun and at the same time see the sun be reflected in the water. Experiment a bit around until you have found the right angle. With this picture, you are going to jump into the goth style. Remember that the settings we are going to change can be saved separately from the terrain that has been created. Later on you can use the changed settings for any other terrain you render. Now you are going to change the colours to the hues of the night. In the landscape window, you can adjust the surface maps. Click the map or one of the childs and click edit, then click colour. Change the surface colours to something dark, like black, brown, green, purple. Leave the dark blues out of it, you need that for the sky later on. Make the colours real dark... that works the best, but not all black. The second part is to change the colour of the water. Make sure the waves are not too large, but there should be some waves for a nice reflection. A clear kind of water works best (deep). Next to work on are the clouds. What a spooky landscape needs are medium sized dark clouds against a moonlit sky. So change the colour of the clouds to something dark: grey, blue, black, maybe purple. With these clouds you need a changed atmosphere. In the atmosphere window you can adjust the colour of the haze (this is the colour of the clouds you’ve set before) the atmospheric blue (best set to some dark hue of Prussian blue) and the decay (set it to a very dark purple) Now all colours are set to fit the night. Render the preview after you changed one of the colours and see what happens. If you don’t like it, change again until you got what you want. Next step is to change the sun into the moon. Open the Lightning conditions window to do this. To make it more spooky, check “clouds cast shadows”. The sunlight has to change colour... the moon has a colder kind of light, some ice- or silver blue. The sunlight strength has to change too. Somewhere between 5 and 10 will do. The disc diameter (setting under Sun’s appearance) can be adjusted, but this is not necessarily (the moon and the sun look the same size, seen from earth). The glow power of the Atmospheric lighting can be reduced. The mist over the water can be achieved in two different ways. You either have your haze in the sky (blurring clouds, moon and atmosphere a bit) or on the water (blurring the landscape). If you want your sky to be blurred, you have to add the mist manually with the paintbrush later on. For having the haze on the water, go to the Atmosphere window and change the Half Height of the Simple Haze. This is a bit tricky and you need some time to check it out properly. When the half height is too low, the haze will be under water, and too high is not good either. What is good for you largely depends on your terrain. A mist on the water is good when the reflection of the moon is still visible. The mist should blur the banks of the lake a bit, making the line between land and water less obvious. To see the haze, you need a good, detailed preview or even a good rendered picture, so this might take a while, especially if the density is low and thus not good visible. Save your settings when you’re satisfied with the rendered preview. Then render the picture for real. To make further editing possible, you better take a picture that is as large and detailed as possible.
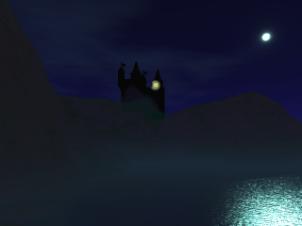
Once you have your perfect landscape rendered, you can import it to a painting program and add some details to the setting. If you have followed the steps, you see the moon in the background of the picture. This indicates that everything placed between the spectator and the moon is lit from behind, making a silhouette of the object. This is quite comfortable, because silhouettes are much easier to draw than other pictures - you don’t have to mind details or shading. Some freeware clip art only comes as silhouette. Draw the silhouette with black on a white background; for beginners it’s easier to make a full silhouette: do not make any “holes” in it. Make sure the edges are black and not a kind of grey fading to white (instead of black, you can pick one of the dark colours you have used for the surface map). Because your silhouette will stand out mostly against the sky, and probably the lake, do not bother about details that will fall away against the dark landscape. Once you have finished the silhouette, you take the “magic wand” from your painting program and select only the black of the picture. Copy this and paste it in the picture you rendered with Terragen. Finish the picture by having the airbrush and make a gentle connection between the silhouette and the surface it is placed upon by spraying a bit of landscape colour on the edge. With the airbrush you can give a building some light, or make a bit of obscure glow in the eyes of a person’s silhouette.
This is the picture I’ve made for the tutorial: in the end, I’m satisfied, but I could have used a lighter (surface) colour for the silhouette of the castle. The colour of the atmosphere could have been somewhat lighter, just like the haze. The waves on the water are a bit too big, just like the reflection is too much. Of course, the silhouette could be much better, but that’s just an example. On my laptop, the picture looked a lot brighter, and on my iMac the colours are usually brighter than on a PC too, so I have the brighness a bit changed later on to you can at least see something.
The orb I used for The World of Daleth is made with Paint Shop Pro. It has a special function to buttonise a picture and then place it in an orb. When you add some extra’s to it and/or make it into an animated .gif (lightning? flying bats?) you enter the world of globe builders. © Yaghish 2004 You have questions, additions or discovered errors in this article? Please leave your comment in the Green Fairy Corner. That is also the place to show off with your own creations! |


| -*-© Steammasters 2003-*- |
| ^ Up |